Imagination, connection, and collaboration drive my teaching, art making, and life. This blog documents travel, food, art making, teaching, education, and the life of my Qatari cat and new Chinese pup. 🎉 Go. Make. Fun.
When I moved to Singapore, I was changing my lifestyle completely. Not only was I moving to a new country, but I was changing into a full time teaching artist.
For the better part of the last 15 years, I had been juggling 3 - 4 part time jobs adding up to one full time job while working in my studio for the remainder of the time. More times than not, these positions were extremely fulfilling, just not enough to pay the bills. Ever. Even when I would log close to 70 or 80 hours a week. Minimum wage just doesn't cut it.
So when I moved to Singapore, one of the things I wanted to do more than anything else in the world was enjoy my newly found weekends. (I didn't have weekends previously: Saturdays and Sundays were just more work-for-other-people days.) And I wanted to enjoy them by doing things: making things, meeting people, learning new skills.
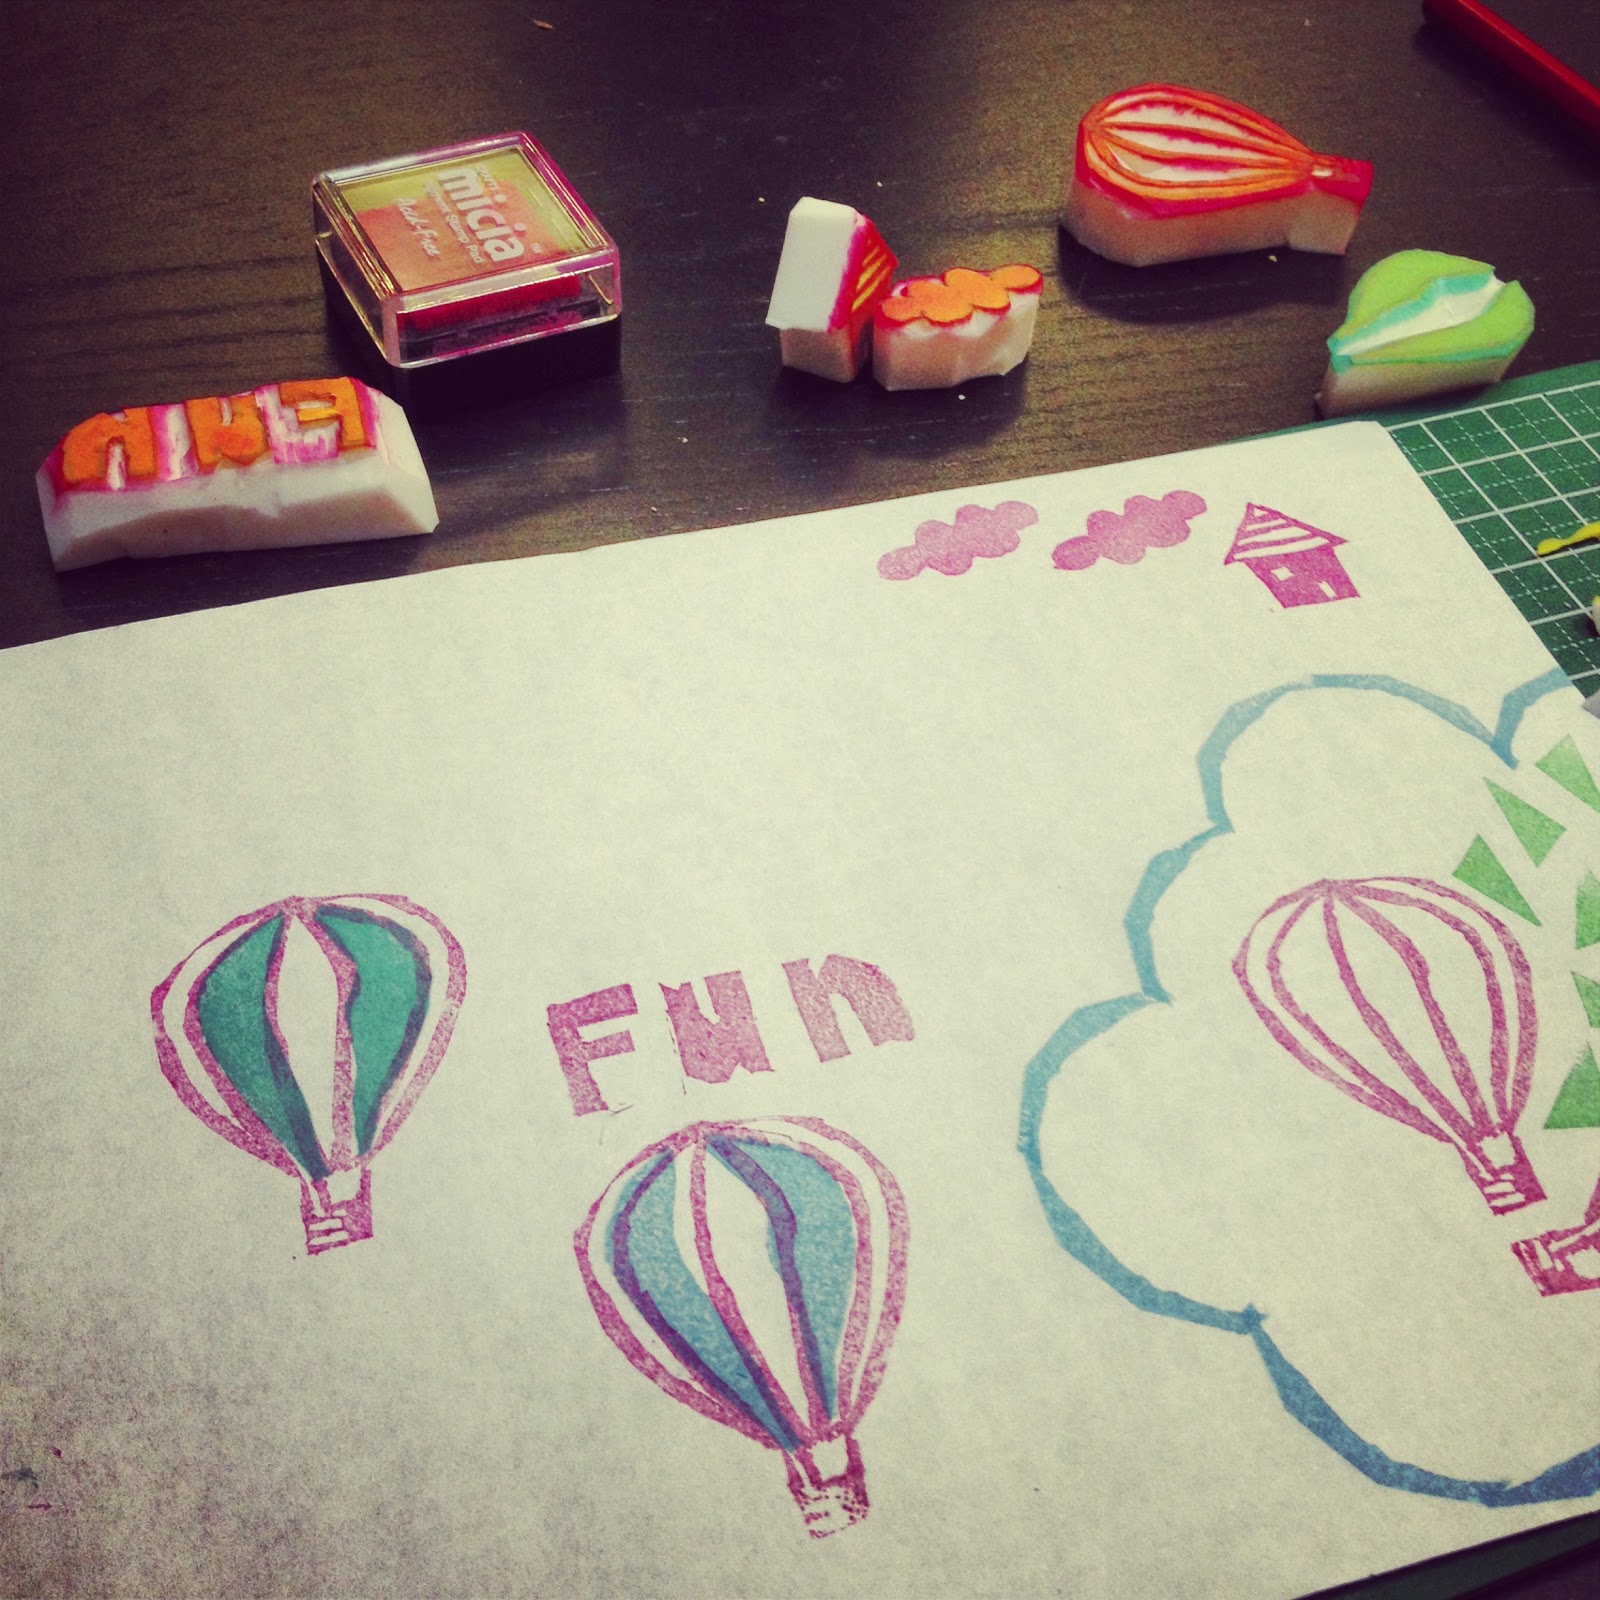
We received all of the tools you see above, plus the example template that we used in class.
Jo was very thorough in her instruction and she created the most elaborate stamping designs I have ever seen . . . Absolutely gorgeous work!
We started each stamp by drawing it on tracing paper and transferring it to our dual-colored stamping pad. (The yellow is carved away making it easier to see your design.)
When we began the carving process, we started on the outside of the design. Next we carved the window, door, and the stripes on the roof. Strangely it resembles foam in the picture below . . . (It's not.)
Progressively each stamp we made became more and more challenging to create. First we did the house, then the cloud, and finally the hot air balloon before jumping into cutting out phrases and letters.
Our final objective was to create a stamp to fill in part of the balloon. You can see below where I have filled in one of my test balloon prints with blue and my other test print with green.
Again I have to mention that this was the most in-depth stamp making workshop I have ever attended. I admire the precision that some of my classmates had. (My work was a bit more clunky.) And it began raining about halfway through the workshop which was sort of unknowingly lulling me to sleep. All-in-all I think the words in the picture below perfectly describe my experience!
If I told you I sucked down a ton of duck fat on Saturday, would you believe me? What if I told you that it was amazingly delicious? That I couldn't stop thinking about cooking with duck fat for the next three days. That the smell of our simmering duck legs in said fat still makes it's way to my memory bank nose and reminds me of precisely what deliciously happy actually tastes like . . . I'm going to let most of this blogpost speak through images. So sit back and enjoy!
On Saturday I had the absolute pleasure of attending my very-first-meetup-ever: Classic French Cooking at Nourish Studios. It was a fun group of 11 people learning about French food and cooking together, all levels of expertise welcomed.
Nourish Studios is located on the Singapore River, just off Clarke Quay. It is a small place: 2 longish countertops housing 4 cooking stations. Just big enough to fit 11 people comfortably. They have all of the pots and pans and cookware that one could possibly need. Utensils, serving plates, mixing bowls: you name it! And they even wash the dishes!
Our faithful leader was Jes (above, center). She came prepared with recipes printed out that we could take home and a timing chart, helping us to stay on task. She divided us into 2 groups of 4 and one group of 3, each group at a different cooking station. Beforehand she laid out all of the miscellaneous ingredients and spices we might need: thyme, olive oil, salt, pepper, bread, mustard, etc.
Our first order of business was to prepare the salads. We made a Rustic Roquefort Salad with Warm Croutons and Bacon. And let-me-tell-you-this: whoever's idea it was to fry up the croutons in the pan with the cooking bacon . . . Pure genius. The flavor of the salty bacon mixed with the bread and the mustard/vinegar dressing was intense, affecting all of the orifices on my face: my nose holes flared with delight as I ate my salad faster than I had ever eaten a salad in my life.
While we were preparing the salad, we tossed four duck legs into a pan filled with duck fat.
Duck Confit is a speciality dish out of France. The confit is prepared in a centuries-old process of preservation that consists of salt curing a piece of meat (generally goose, duck, or pork) and then poaching it in its own fat.
The legs had to cook for close to an hour, since we weren't baking them half-way through in the oven. So as they were simmering away, we started on the Braised Puy Lentils. In a large pot, we placed carrots, celery, onions, and lentils. Jes showed us how to make a bouquet garni as well. We let this cook for 45 minutes, stirring and tasting occasionally.
My favorite part of our cooking came with the preparation of the Spiced Pear Tarte Tatin. The smell alone was heavenly: pears and vanilla, straight from the bean. Incredible!
If you are going to get messy during a day of cooking, getting vanilla bean on your fingertips is completely the way to go . . .
I had an incredible time meeting new people and experiencing new taste sensations. If you are interested in borrowing any of the recipes prepared during this class, please feel free to email me. Next up? My Big Fat Greek Wedding happening in March. I'll keep you posted!
Stay with me through this post . . . It took me a while to really be one with this project.
The third grade teachers met with me to see if I would help their students build dioramas relating to different natural disasters. I love collaboration. I wrote my thesis in graduate school on collaboration. So I was game for just about anything . . . But while I loved building dioramas when I was in elementary school, they are projects that everyone does. So I was wracking my brain trying to figure out how to make these pieces come to life in a progressive, new way.
While I was frantically trying to figure out what supplies we would use--we placed a huge order in October and it will be delivered in February (go figure)--and whether the students would work together in teams or alone, I had them do some research. All artists know that projects do not come together without proper research, always looking at images and taking notes on everything.
I divided each of my six third grade classes into 3 big groups: tsunamis, volcanoes, and earthquakes. (I lovingly referred to this last group of kiddos as my e-quakes.) In these larger, umbrella groups they had to research and find out two things for me before presenting it back to the class as a whole.
1. Name 3 examples of your natural disaster, where they were/are located and what their name was/is (if there is one . . . )
2. What were the effects of your natural disaster on the surrounding community?
They used their iPads for the research and recorded their answers in their sketchbooks. As always, they could work on the table, on the floor, or in the gallery space just outside my classroom. You can see from the photo above that even laying on the table is an option . . .
After their research presentations were complete, I had each student draw out a labeled preliminary sketch of their natural disaster and how they were going to create a sculptural piece: what materials would they need and what colors would they use. Each student was responsible for creating his or her own sketch, even though in the end some of them worked in groups of 3.
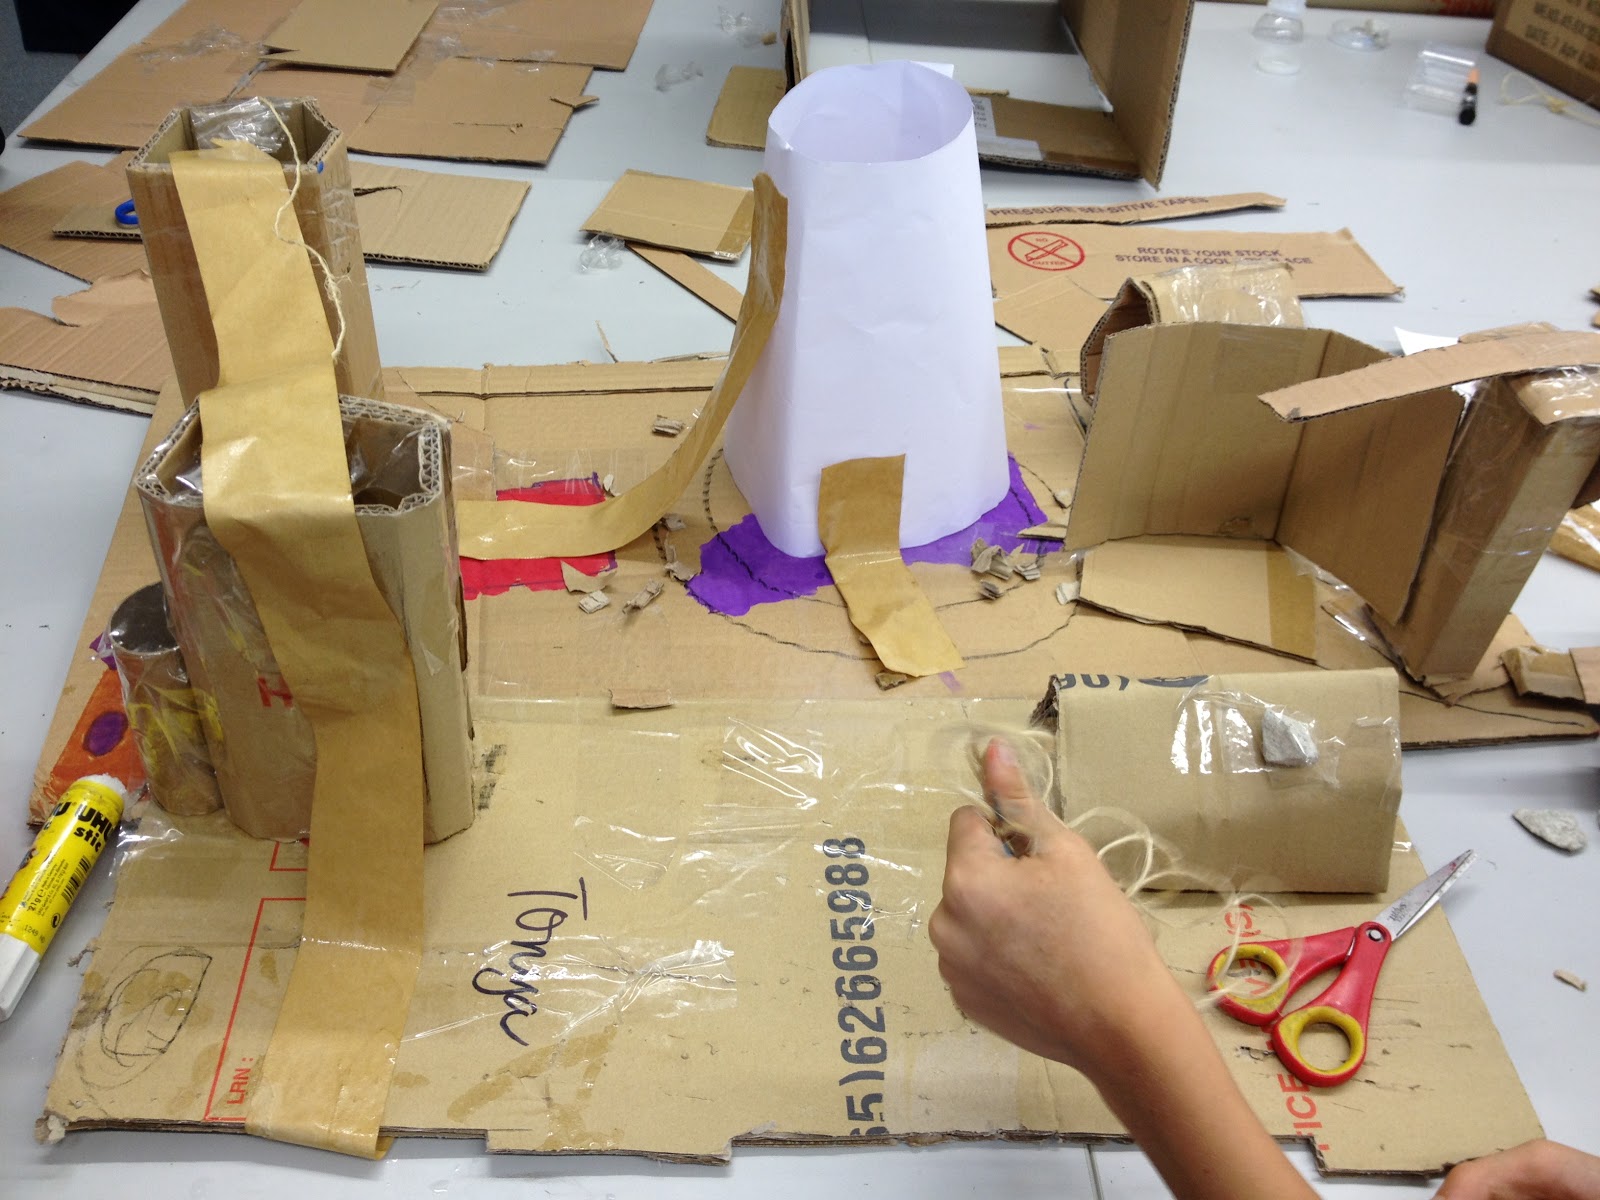
Materials. For this project, I had the students use a lot of cardboard and newspaper. Recyclables and found objects, things that we could easily hunt down around the school or bring in from home. Not unlike the machine project I worked on with my fourth graders.
Look up images of earthquakes online. Or Tsunamis. What you see are images of the aftermath: piles and piles of things that once belonged to someone, was important to someone but now resembles rubbish. Heartbreaking images, but the students and I agreed that cardboard, air dry clay, and newspaper would be the best way to represent natural disasters, the most aesthetically pleasing.
It took the students about 4 weeks to work on this project from start to finish. And they were incredibly inventive in their designs. The image above is the understructure of an earthquake. The open area in the middle is the earthquake and the thin piece on the top connecting the two buildings is a bridge. The layers and layers of cardboard that they stacked for the base really worked well and looked very realistic when they painted it. And when they displayed it, they kind of popped the middle area up a bit so that it looked like the earth had broken in two.
The student below, also studying earthquakes, created an amazing contraption where she could pull strings from the base of her piece and make the building fold in on itself. I didn't show her how to do any of this. She had a vision, and with the materials provided she made it happen.
The students above ended up making one giant wave for their tsunami project. This helped convey just how big and powerful seismic sea waves are.
Below, see how the earthquake from further up in this post is beginning to take shape with the addition of color.
What's great about using materials like these is that the students are then able to be more in control of their creativity: they choose how big or small they want their piece to be and they problem solve how to put things together in a way that when I walk past to test it by picking it up, it doesn't fall apart. This also becomes a lesson in using what you have, allowing imagination to go a bit further.
Without a doubt, exploding the volcanoes was the most fun of all. We experimented with 3 different combinations: Coke and Mentos, vinegar and baking soda, and Sprite and Alka-Seltzer. I had forgotten about Alka-Seltzer, my students surprised me with that one.
The video above is a 6 second film I made on my new iPhone app, Vine. What's fun about Vine videos is that they loop (not in this blogpost, but on the actual app), so it's sort of like a gif. It plays the same 6 seconds over and over and over again. So the sounds repeat and the images repeat. They can be really funny sometimes.
You remember my third graders, right?My post from several months ago . . . My third grade classes are completely boy heavy, some of my classes having as little as 6 girls in a class of 24. This project was actually the perfect fit for them. As long as I was able to batten down the paint throwing and keep the explosions under control, we were good!
And they loved it: this project kept everyone--including me--excited and engaged. One of the best parts is that it completely related back to what the students were learning right then and there in their classrooms. And it brought me closer to my third graders, my third graders who are now some of my most fun and hilarious classes to see during the week.
For the final part of the project, I had the students write process statements about what they made. They had to include either a video or a series of images with their paragraphs.
Most of their process statements looked something like this: "I started my project with a big square cardboard piece then I painted it green for grass. After that I covered it with bits and bobs and scraps of cardboard, then I made four little buildings out of cardboard. I painted it black and little white rectangles for windows. I made the buildings wobbly so it would look like an earthquake." Or like this, "Today in art we get to erupt a volcano! The materials were clay, cardboard, coke, and paint. It took about 2 weeks. It was fun making it. I think it will be a good volcano. This is my best volcano ever!"
Most of their videos looked like this:
My goal with including a writing portion is to get them used to thinking about their artwork as a finished piece, ready for showing. Writing a process or artist statement helps to finalize the work. It provides an item for their homeroom teacher to look over and a self-assesment of their completed work.
Project perfection! Keep up the great work, third graders!